MASTG-TECH-0023: Reviewing Decompiled Java Code
Following the example from Decompiling Java Code, we assume that you've successfully decompiled and opened the Android UnCrackable L1 app in jadx. Once jadx has finished decompiling, you can browse the decompiled classes by selecting them in the file tree. Note that many of the decompiled packages, classes, and methods have weird one-letter names; this is because the bytecode has been "minified" with ProGuard at build time. This is a basic type of obfuscation (see Obfuscation) that makes the bytecode a little more difficult to read, but with a fairly simple app like this one, it won't cause you much of a headache. When you're analyzing a more complex app, however, it can get quite annoying.
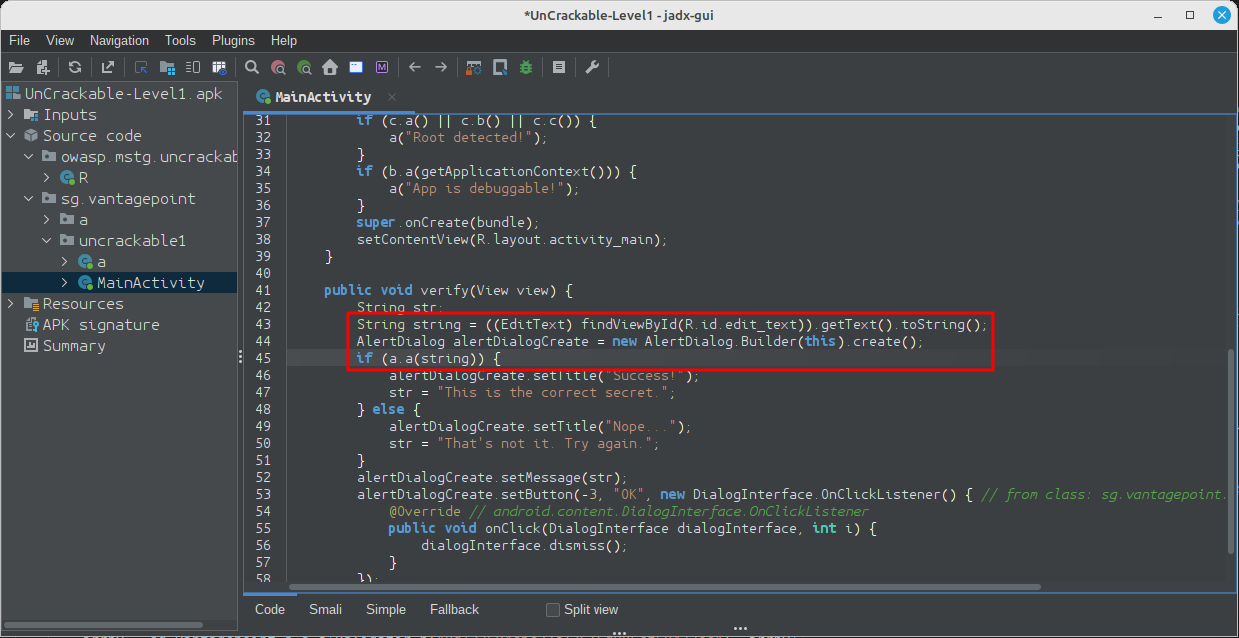
When analyzing obfuscated code, annotating class names, method names, and other identifiers as you go along is a good practice. Open the MainActivity class in the package sg.vantagepoint.uncrackable1. The method verify is called when you tap the "verify" button. This method passes the user input to a static method called a.a, which returns a boolean value. It seems plausible that a.a verifies user input, so we'll refactor the code to reflect this.
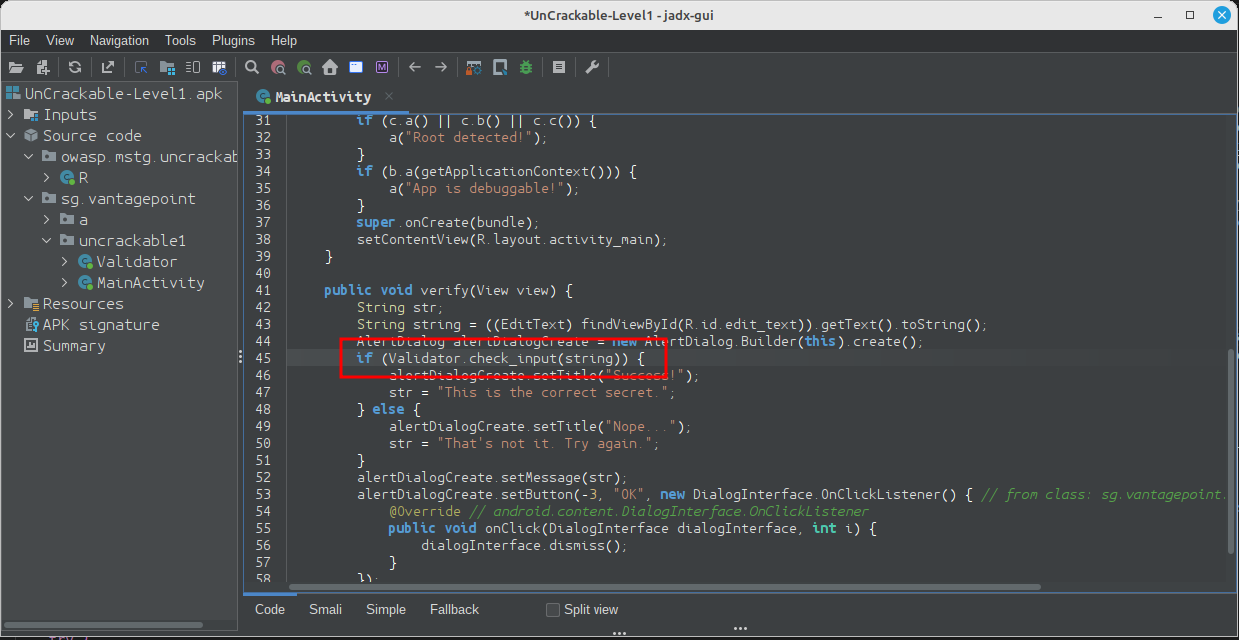
Right-click the class name (the first a in a.a) and select Rename from the drop-down menu (or press N). Change the class name to something that makes more sense given what you know about the class so far. For example, you could call it "Validator" (you can always revise the name later). a.a now becomes Validator.a. Follow the same procedure to rename the static method a to check_input.
Congratulations, you just learned the fundamentals of static analysis! It is all about theorizing, annotating, and gradually revising theories about the analyzed program until you understand it completely or, at least, well enough for whatever you want to achieve.
Next, Ctrl+click (or Command+click on Mac) on the check_input method. This takes you to the method definition. The decompiled method looks like this:
    public static boolean check_input(String str) {
        byte[] bArrA;
        byte[] bArr = new byte[0];
        try {
            bArrA = sg.vantagepoint.a.a.a(b("8d127684cbc37c17616d806cf50473cc"), Base64.decode("5UJiFctbmgbDoLXmpL12mkno8HT4Lv8dlat8FxR2GOc=", 0));
        } catch (Exception e) {
            Log.d("CodeCheck", "AES error:" + e.getMessage());
            bArrA = bArr;
        }
        return str.equals(new String(bArrA));
    }
So, you have a Base64-encoded String that's passed to the function a in the package sg.vantagepoint.a.a (again, everything is called a) along with something that looks suspiciously like a hex-encoded encryption key (16 hex bytes = 128bit, a common key length). What exactly does this particular a do? Ctrl-click it to find out.
public class a {
    public static byte[] a(byte[] bArr, byte[] bArr2) {
        SecretKeySpec secretKeySpec = new SecretKeySpec(bArr, "AES/ECB/PKCS7Padding");
        Cipher cipher = Cipher.getInstance("AES");
        cipher.init(2, secretKeySpec);
        return cipher.doFinal(bArr2);
    }
}
Now you're getting somewhere: it's simply standard AES-ECB. Looks like the Base64 string stored in arrby1 in check_input is a ciphertext. It is decrypted with 128-bit AES, then compared with the user input. As a bonus task, try to decrypt the extracted ciphertext and find the secret value!
A faster way to get the decrypted string is to add dynamic analysis, as explained in Method Hooking.
Tests
MASTG-TEST-0282: Unsafe Custom Trust Evaluation MASTG-TEST-0284: Incorrect SSL Error Handling in WebViews MASTG-TEST-0283: Incorrect Implementation of Server Hostname Verification MASTG-TEST-0201: Runtime Use of APIs to Access External Storage MASTG-TEST-0202: References to APIs and Permissions for Accessing External Storage MASTG-TEST-0287: Runtime Storage of Unencrypted Data via the SharedPreferences API MASTG-TEST-0375: Missing Validation of Data Returned from Implicit Intents MASTG-TEST-0382: Runtime Use of Enforced Updating APIs MASTG-TEST-0392: References to Enforced Updating APIs MASTG-TEST-0400: Runtime Use of WebViewClient URL Loading Handlers MASTG-TEST-0372: Implicit Intents Used for Internal App Communication MASTG-TEST-0374: References to Implicit Intents Carrying Sensitive Extras MASTG-TEST-0398: References to WebViewClient URL Loading Handlers MASTG-TEST-0352: References to Debugging Detection APIs MASTG-TEST-0353: Runtime Use of Debugging Detection APIs MASTG-TEST-0368: Insufficient Obfuscation of Security-Relevant Java/Kotlin Code MASTG-TEST-0051: Testing Obfuscation MASTG-TEST-0338: References to Storage Integrity Check APIs MASTG-TEST-0334: Native Code Exposed Through WebViews MASTG-TEST-0365: Exported And Unprotected Services That Expose Sensitive Functionality MASTG-TEST-0251: Runtime Use of Content Provider Access APIs in WebViews MASTG-TEST-0357: References to Oversharing of File-Based Content Providers MASTG-TEST-0366: Exported And Unprotected Broadcast Receivers That Expose Sensitive Functionality MASTG-TEST-0253: Runtime Use of Local File Access APIs in WebViews MASTG-TEST-0364: Exported And Unprotected Activities That Expose Sensitive Functionality MASTG-TEST-0394: Missing Input Validation in Custom URL Scheme Handlers MASTG-TEST-0316: App Exposing User Authentication Data in Text Input Fields MASTG-TEST-0204: Insecure Random API Usage MASTG-TEST-0221: Broken Symmetric Encryption Algorithms MASTG-TEST-0232: Broken Symmetric Encryption Modes MASTG-TEST-0205: Non-random Sources Usage MASTG-TEST-0350: Runtime Use of Broken Symmetric Encryption Modes
Demos
MASTG-DEMO-0152: Custom URL Scheme Handler Without Input Validation with semgrep