MASTG-TECH-0011: Setting Up an Interception Proxy
Several tools support the network analysis of applications that rely on the HTTP(S) protocol. The most important tools are the so-called interception proxies; ZAP (Zed Attack Proxy) and Burp Suite are the most famous. An interception proxy gives the tester a Machine-in-the-Middle (MITM) position. This position is useful for reading and/or modifying all app requests and endpoint responses, which are used for testing Authorization, Session, Management, etc.
Interception Proxy for a Virtual Device
Setting Up a Web Proxy on an Android Virtual Device (AVD)
The following procedure, which works on the Android emulator that ships with Android Studio 3.x, is for setting up an HTTP proxy on the emulator:
- Set up your proxy to listen on localhost and, for example, port 8080.
-
Configure the HTTP proxy in the emulator settings:
- Click on the three dots in the emulator menu bar
- Open the Settings Menu
- Click on the Proxy tab
- Select Manual proxy configuration
- Enter "127.0.0.1" in the Host Name field and your proxy port in the Port number field (e.g., "8080")
- Tap Apply
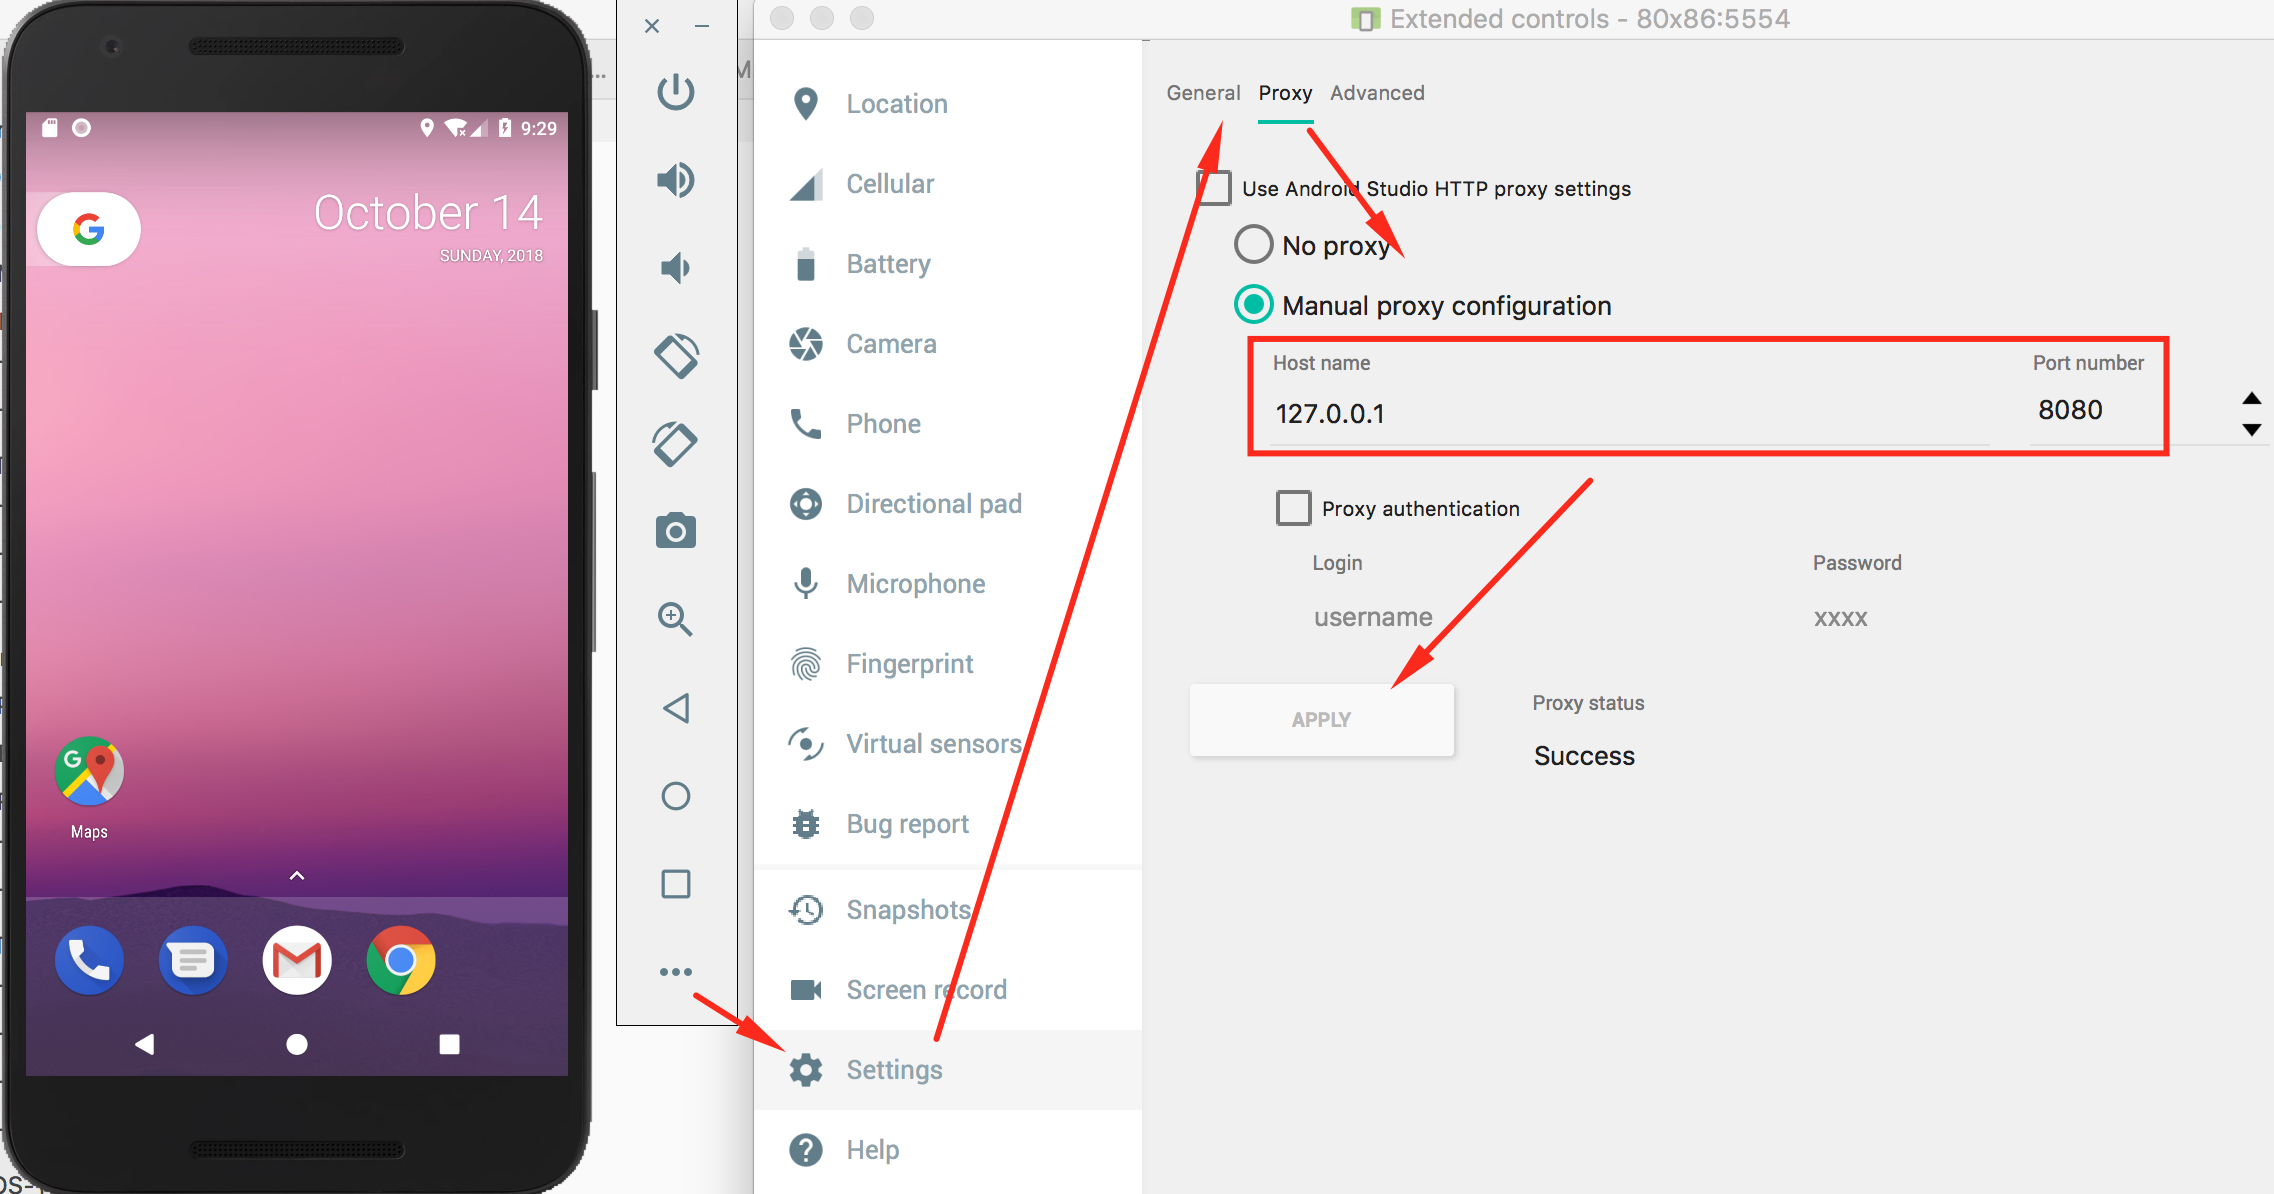
HTTP and HTTPS requests should now be routed over the proxy on the host computer. If not, try toggling airplane mode off and on.
A proxy for an AVD can also be configured on the command line by using the emulator command when starting an AVD. The following example starts the AVD Nexus_5X_API_23 and sets a proxy to 127.0.0.1 and port 8080.
emulator @Nexus_5X_API_23 -http-proxy 127.0.0.1:8080
Installing a CA Certificate on the Virtual Device
An easy way to install a CA certificate is to push the certificate to the device and add it to the certificate store via Security Settings. For example, you can install the PortSwigger (Burp) CA certificate as follows:
- Start Burp and use a web browser on the host to navigate to burp/, then download
cacert.derby clicking the "CA Certificate" button. - Change the file extension from
.derto.cer. -
Push the file to the emulator:
adb push cacert.cer /sdcard/ -
Navigate to Settings -> Security -> Install from SD Card.
- Scroll down and tap
cacert.cer.
You should then be prompted to confirm installation of the certificate (you'll also be asked to set a device PIN if you haven't already).
This installs the certificate in the user certificate store (tested on Genymotion VM). To place the certificate in the root store, you can perform the following steps:
- Run adb as root with
adb rootandadb shell. - Locate the newly installed certificate at
/data/misc/user/0/cacerts-added/. - Copy the certificate to the following folder
/system/etc/security/cacerts/. - Reboot the Android VM.
For Android 7.0 (API level 24) and above, follow the same procedure described in the "Bypassing the Network Security Configuration" section.
Interception Proxy for a Physical Device
The available network setup options must be evaluated first. The mobile device used for testing and the host computer running the interception proxy must be connected to the same Wi-Fi network. Use either an (existing) access point or create an ad-hoc wireless network.
Once you've configured the network and established a connection between the testing host computer and the mobile device, several steps remain.
- The proxy must be configured to point to the interception proxy.
- The interception proxy's CA certificate must be added to the trusted certificates in the Android device's certificate storage. The location of the menu used to store CA certificates may depend on the Android version and Android OEM modifications of the settings menu.
- Some applications (e.g. the Chrome browser) may show
NET::ERR_CERT_VALIDITY_TOO_LONGerrors, if the leaf certificate happens to have a validity extending a certain time (39 months in case of Chrome). This happens if the default Burp CA certificate is used, since the Burp Suite issues leaf certificates with the same validity as its CA certificate. You can circumvent this by creating your own CA certificate and importing it to the Burp Suite, as explained in this blog post.
After completing these steps and starting the app, the requests should show up in the interception proxy.
A video of setting up ZAP (Zed Attack Proxy) with an Android device can be found on secure.force.com.
A few other differences: from Android 8.0 (API level 26) onward, the network behavior of the app changes when HTTPS traffic is tunneled through another connection. And from Android 9 (API level 28) onward, the SSLSocket and SSLEngine will behave a little bit differently in terms of error handling when something goes wrong during the handshakes.
As mentioned before, starting with Android 7.0 (API level 24), the Android OS will no longer trust user CA certificates by default, unless specified in the application. In the following section, we explain two methods to bypass this Android security control.
Bypassing the Network Security Configuration
In this section, we will present several methods to bypass Android's Network Security Configuration.
Adding Custom User Certificates to the Network Security Configuration
There are different configurations available for the Network Security Configuration to add non-system Certificate Authorities via the src attribute:
<certificates src=["system" | "user" | "raw resource"]
              overridePins=["true" | "false"] />
Each certificate can be one of the following:
"raw resource"is an ID pointing to a file containing X.509 certificates"system"for the pre-installed system CA certificates"user"for user-added CA certificates
The CA certificates trusted by the app can be a system-trusted CA as well as a user CA. Usually, you will have added the certificate of your interception proxy already as an additional CA in Android. Therefore, we will focus on the "user" setting, which allows you to force the Android app to trust this certificate with the following Network Security Configuration below:
<network-security-config>
   <base-config>
      <trust-anchors>
          <certificates src="system" />
          <certificates src="user" />
      </trust-anchors>
   </base-config>
</network-security-config>
To implement this new setting you must follow the steps below:
-
Decompile the app using a decompilation tool like apktool:
apktool d <filename>.apk -
Make the application trust user certificates by creating a Network Security Configuration that includes
<certificates src="user" />as explained above -
Go into the directory created by apktool when decompiling the app and rebuild the app using apktool. The new apk will be in the
distdirectory.apktool b -
You need to repackage the app, as explained in " Repackaging Apps". For more details on the repackaging process, you can also consult the Android developer documentation, which explains the process as a whole.
Note that even if this method is quite simple, its major drawback is that you have to apply this operation for each application you want to evaluate, which is additional overhead for testing.
Bear in mind that if the app you are testing has additional hardening measures, like verification of the app signature, you might not be able to start the app anymore. As part of the repackaging, you will sign the app with your own key, and therefore, the signature changes will result in triggering such checks that might lead to immediate termination of the app. You would need to identify and disable such checks either by patching them during repackaging of the app or by dynamic instrumentation through Frida.
There is a Python script available that automates the steps described above called Android-CertKiller. This Python script can extract the APK from an installed Android app, decompile it, make it debuggable, add a new Network Security Configuration that allows user certificates, build and sign the new APK, and install the new APK with the SSL Bypass.
python main.py -w

***************************************
Android CertKiller (v0.1)
***************************************

CertKiller Wizard Mode
---------------------------------
List of devices attached
4200dc72f27bc44d    device

---------------------------------

Enter Application Package Name: nsc.android.mstg.owasp.org.android_nsc

Package: /data/app/nsc.android.mstg.owasp.org.android_nsc-1/base.apk

I. Initiating APK extraction from device
   complete
------------------------------
I. Decompiling
   complete
------------------------------
I. Applying SSL bypass
   complete
------------------------------
I. Building New APK
   complete
------------------------------
I. Signing APK
   complete
------------------------------

Would you like to install the APK on your device(y/N): y
------------------------------------
 Installing Unpinned APK
------------------------------
Finished
Adding the Proxy's certificate among system-trusted CAs using Magisk
In order to avoid the obligation of configuring the Network Security Configuration for each application, we must force the device to accept the proxy's certificate as one of the system's trusted certificates.
There is a Magisk module that will automatically add all user-installed CA certificates to the list of system-trusted CAs.
Download the latest version of the module at the Github Release page, push the downloaded file over to the device, and import it in the Magisk Manager's "Module" view by clicking on the + button. Finally, a restart is required by Magisk Manager to let changes take effect.
From now on, any CA certificate that is installed by the user via "Settings", "Security & location", "Encryption & credentials", "Install from storage" (location may differ) is automatically pushed into the system's trust store by this Magisk module. Reboot and verify that the CA certificate is listed in "Settings", "Security & location", "Encryption & credentials", "Trusted credentials" (location may differ).
Manually adding the Proxy's certificate among system trusted CAs
Alternatively, you can follow the following steps manually in order to achieve the same result:
- Make the /system partition writable, which is only possible on a rooted device. Run the 'mount' command to make sure the /system is writable:
mount -o rw,remount /system. If this command fails, try running the following commandmount -o rw,remount -t ext4 /system -
Prepare the proxy's CA certificates to match the system certificates format. Export the proxy's certificates in
derformat (this is the default format in Burp Suite), then run the following commands:$ openssl x509 -inform DER -in cacert.der -out cacert.pem $ openssl x509 -inform PEM -subject_hash_old -in cacert.pem | head -1 mv cacert.pem <hash>.0 -
Finally, copy the
<hash>.0file into the directory /system/etc/security/cacerts and then run the following command:chmod 644 <hash>.0
By following the steps described above, you allow any application to trust the proxy's certificate, which allows you to intercept its traffic, unless, of course, the application uses SSL pinning.
Potential Obstacles
Applications often implement security controls that make it more difficult to perform a security review of the application, such as root detection and certificate pinning. Ideally, you would acquire both a version of the application that has these controls enabled and one where the controls are disabled. This allows you to analyze the proper implementation of the controls, after which you can continue with the less-secure version for further tests.
Of course, this is not always possible, and you may need to perform a black-box assessment on an application where all security controls are enabled. The section below shows you how you can circumvent certificate pinning for different applications.
Client Isolation in Wireless Networks
Once you have set up an interception proxy and have a MITM position, you might still not be able to see anything. This might be due to restrictions in the app (see next section), but it can also be due to so-called client isolation in the Wi-Fi that you are connected to.
Wireless Client Isolation is a security feature that prevents wireless clients from communicating with one another. This feature is useful for guest and BYOD SSIDs, adding a level of security to limit attacks and threats between devices connected to the wireless networks.
What to do if the Wi-Fi we need for testing has client isolation?
You can configure the proxy on your Android device to point to 127.0.0.1:8080, connect your phone via USB to your host computer and use adb to make a reverse port forwarding:
adb reverse tcp:8080 tcp:8080
Once you have done this, all proxy traffic on your Android phone will be going to port 8080 on 127.0.0.1, and it will be redirected via adb to 127.0.0.1:8080 on your host computer, and you will see the traffic in your Burp. With this trick, you are able to test and intercept traffic also in Wi-Fis networks that have client isolation.
Non-Proxy Aware Apps
Even after setting up an interception proxy and achieving a MITM position, you may still not be able to see any HTTP requests. This is mainly for the following reasons:
- The app uses a cross-platform framework that does not use the Android OS proxy settings.
- The app you are testing may also be verifying whether a proxy is set and not allowing any communication.
In both scenarios, additional steps are required to view the traffic. The sections below describe two solutions: bettercap and iptables.
You could also use an access point that is under your control to redirect the traffic, but this would require additional hardware, and we focus for now on software solutions.
For both solutions, you need to activate "Support invisible proxying" in Burp, in Proxy Tab/Options/Edit Interface.
iptables
You can use iptables on the Android device to redirect all traffic to your interception proxy. The following command would redirect port 80 to your proxy running on port 8080
iptables -t nat -A OUTPUT -p tcp --dport 80 -j DNAT --to-destination <Your-Proxy-IP>:8080
Verify the iptables settings and check the IP and port.
$ iptables -t nat -L
Chain PREROUTING (policy ACCEPT)
target     prot opt source               destination

Chain INPUT (policy ACCEPT)
target     prot opt source               destination

Chain OUTPUT (policy ACCEPT)
target     prot opt source               destination
DNAT       tcp  --  anywhere             anywhere             tcp dpt:5288 to:<Your-Proxy-IP>:8080

Chain POSTROUTING (policy ACCEPT)
target     prot opt source               destination

Chain natctrl_nat_POSTROUTING (0 references)
target     prot opt source               destination

Chain oem_nat_pre (0 references)
target     prot opt source               destination
In case you want to reset the iptables configuration, you can flush the rules:
iptables -t nat -F
bettercap
See Achieving a MITM Position via ARP Spoofing for further preparation and instructions for running bettercap.
The host computer where you run your proxy and the Android device must be connected to the same wireless network. Start bettercap with the following command, replacing the IP address below (X.X.X.X) with the IP address of your Android device.
$ sudo bettercap -eval "set arp.spoof.targets X.X.X.X; arp.spoof on; set arp.spoof.internal true; set arp.spoof.fullduplex true;"
bettercap v2.22 (built for darwin amd64 with go1.12.1) [type 'help' for a list of commands]

[19:21:39] [sys.log] [inf] arp.spoof enabling forwarding
[19:21:39] [sys.log] [inf] arp.spoof arp spoofer started, probing 1 targets.
Proxy Detection
Some mobile apps are trying to detect if a proxy is set. If that's the case, they will assume that this is malicious and will not work properly.
In order to bypass such a protection mechanism, you could either set up bettercap or configure iptables so that you don't need a proxy setup on your Android phone. A third option we didn't mention before, and that is applicable in this scenario, is using Frida. It is possible on Android to detect if a system proxy is set by querying the ProxyInfo class and checking the getHost() and getPort() methods. There might be various other methods to achieve the same task, and you would need to decompile the APK in order to identify the actual class and method name.
Below you can find boilerplate source code for a Frida script that will help you to overload the method (in this case called isProxySet) that verifies if a proxy is set and will always return false. Even if a proxy is now configured, the app will now think that none is set as the function returns false.
setTimeout(function(){
    Java.perform(function (){
        console.log("[*] Script loaded")

        var Proxy = Java.use("<package-name>.<class-name>")

        Proxy.isProxySet.overload().implementation = function() {
            console.log("[*] isProxySet function invoked")
            return false
        }
    });
});
Tests
MASTG-TEST-0236: Cleartext Traffic Observed on the Network MASTG-TEST-0244: Missing Certificate Pinning in Network Traffic