MASTG-TECH-0125: Intercepting Xamarin Traffic
Xamarin is a mobile app development platform that allows developers to create native Android and iOS apps using Visual Studio and C#.
When testing a Xamarin app, setting the system proxy in the Device Wi-Fi settings will not capture any HTTP requests in your interception proxy. This is because Xamarin apps do not use the local proxy settings of your device. There are three ways to bypass this limitation:
Option 1: Manipulating Xamarin's Network Stack Default Proxy
Patch the app to use a default proxy by adding the following code in the OnCreate or Main method:
WebRequest.DefaultWebProxy = new WebProxy("192.168.11.1", 8080);
Finally, recompile and sign the patched app.
Alternatively, use Frida to hook into the WebRequest.DefaultWebProxy property and dynamically set the proxy to your interception proxy.
Option 2: Achieving a MITM Position via ARP Spoofing
Use bettercap to achieve a MITM position and redirect port 443 to your interception proxy running on localhost.
On macOS:
echo "
rdr pass inet proto tcp from any to any port 443 -> 127.0.0.1 port 8080
" | sudo pfctl -ef -
On Linux:
sudo iptables -t nat -A PREROUTING -p tcp --dport 443 -j DNAT --to-destination 127.0.0.1:8080
Lastly, enable "Support invisible proxy" in the listener settings of Android Studio.
Option 3: DNS Spoofing
If you can modify the device's DNS resolution (DNS Spoofing), you can reroute the app's traffic to your proxy. For example, on a rooted Android device, you can add an entry in /etc/hosts mapping the app's server domain to your proxy machine's IP. This makes the app believe that your machine is the legitimate server.
Since DNS spoofing redirects traffic at the domain level, incoming connections will still use the original destination port (e.g., 443 for HTTPS). To properly intercept the traffic with your proxy (which may be running on a different port, like 8080), you need port redirection. This ensures that traffic arriving at 443 is forwarded to the proxy's listening port.
Once redirected, the proxy can inspect, modify, or relay the traffic to the actual server, effectively acting as a MITM (as done with bettercap).
Setting Up Traffic Redirection and the Interception Proxy
If you haven't already, set up your interception proxy. See Intercepting HTTP Traffic Using an Interception Proxy.
Tip: When redirecting traffic, create specific rules for only the domains and IPs in scope to reduce noise from out-of-scope traffic.
Ensure that your interception proxy listens on the port defined in your redirection rule (8080 in this case).
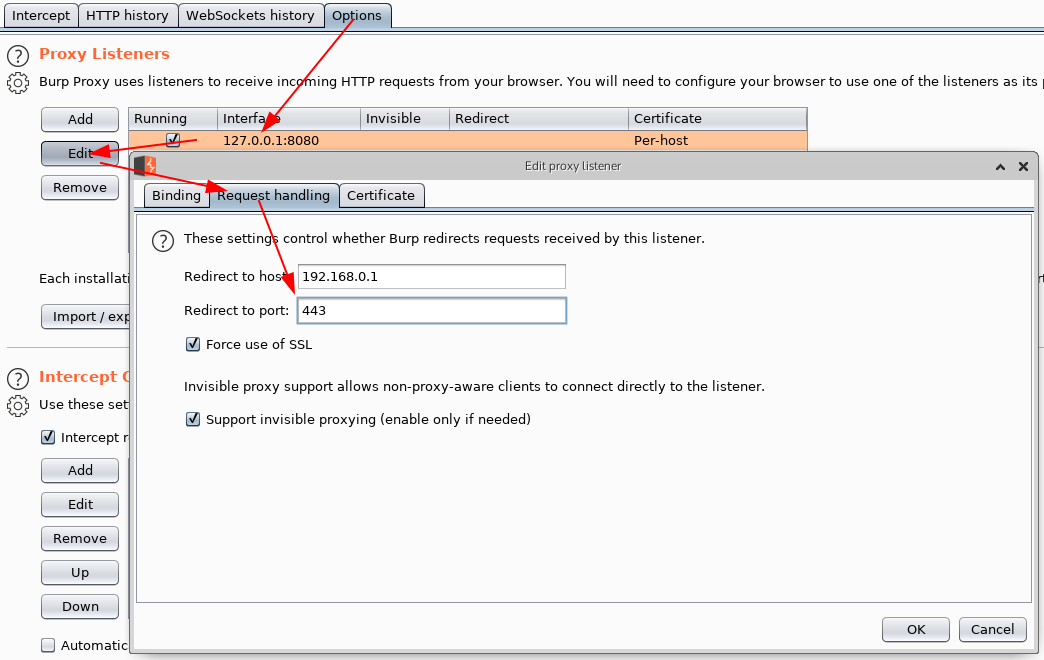
After redirecting traffic to your interception proxy, you need to forward it back to its original destination. The following steps set up redirection in Burp Suite:
- Open the Proxy tab and click on Options.
- Select and edit your listener from the list of proxy listeners.
- Navigate to the Request Handling tab and configure:
- Redirect to host: Set this to the original server destination.
- Redirect to port: Specify the original port.
- Enable "Force use of SSL" (if HTTPS is used) and "Support invisible proxy".

Start Intercepting Traffic
Now, start using the app and trigger its functions. If configured correctly, HTTP messages should appear in your interception proxy.
Note
When using Bettercap or DNS Spoofing, enable "Support invisible proxying" under Proxy Tab → Options → Edit Interface. Ensure the proxy settings are properly configured to handle both HTTP and HTTPS traffic for full visibility.